Final Spartan Helmet

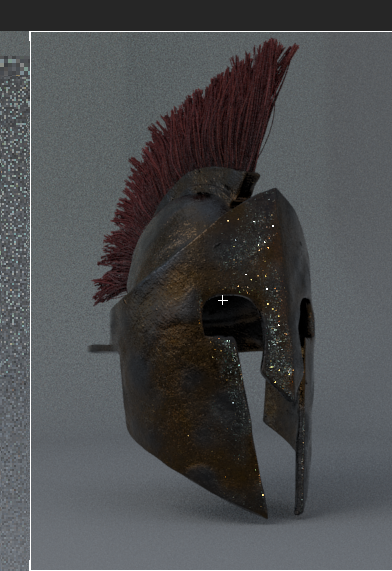
In the final video mainly goes over the lighting of the model. To do this I added tree spotlights and altered the colors to a blue and red tone. This will help create the shine on the helmet. After placing the lights the model is complete and ready for rendering. To do this you will open the render settings and change the number of renders to 10. This will increase the quality of the final image. And now the model is complete, I’m glad I was able to finish it this year.

Spartan helmet update 10-12

10

11

12

For this update I’ve completed video 10-12. In these videos i was instructed on how to change the color of the groom a well as finishing up the texture of the helmet itself. From here we were instructed on how to model the pedestal for the helmet. To do this we used cylinders and several extrusions to make the shape of the base. Then completing the pedestal by adding a cylinder vertically in the center of the base. After this we assign a simple color to the pedistal and turn the roughness up to decrease the shine.

Spartan Helmet Video 7-9 update

After

For this update, I’ve completed videos 7 through 9. In these videos I am instructed on the first steps of using Arnold with the model. In video seven, we make the background and set up some basic lighting for the model. This prepares it for the next step, rendering. In videos 8 and 9, we focus on rendering the model. Making sure to select every piece of the model and assign it to aistandardsurface. From here we used various nodes within Arnold to modify the color and bumb map of the model.

Spartan helmet: Video #5

Before

After

For this assignment, I followed the instructions listed in video five of the spartan helmet. For this, I was instructed to duplicate selected faces on the crown of the helmet. From here, I adjusted the geometry until I was able to mirror the shape to the other side. Continuing on, I was instructed to extrude and offset the face. To do this, I used a combination of the extrude faces tool and the “g” key. In the last portion of the video, we were instructed to shape the extrusions we made previously. Now there is a place for what we will be modeling in the next video.

Spartan helmet Video #4

Before

After

For this assignment, I finished up the fourth video lesson. To do this, I used the cut tool to add loops in various places of the model. Doing this helped keep the sharpness of some angles of the model. For example, the center line of the model, we were instructed to select and bevel. Upon doing this, the center-line was maintained. From here, I started the fifth video for the model. I will soon complete that video and then post an update of my progress.

Spartan helmet Update: video #3

Before

After

For this update, I completed video three for the spartan helmet. In doing so, I was instructed on how to make the lower portion of the helmet. To do this, I extruded the bottom edges of the model down towards the end of the reference image. From here, I used the soft selection tool to move the vertexes to the desired points. When moving the points I switched between soft selection a regular selection using the b key. After extruding, I used the multi-cut tool to cut out the eyehole. After matching up the points a bit more, I mirrored the model to check my progress.

Spartan helmet: Video #2 update

For this update, I’ve completed the second video provided to us. In this video, I was instructed on how to start modeling the spartan helmet. Starting with a cylinder. I matched up the edges to the helmet. From here I used a sphere to model the crown of the helmet. To complete this portion of the model I was instructed to combine the objects and bridge the edges of the model. Doing this created polygons in the space between the two shapes. With some time remaining in class, I started working on the third video.

Spartan Helmet: Video #2 update

(Images will be uploaded the morning of Jan 12.

For this video I was instructed to begin modeling. To do this, I followed the directions listed in the second video of the spartan helmet.

To begin I was instructed to create a cylinder in the middle of my scene. Using the scale and positioning tool to match the model with the image plane. Making sure to align the cylinder with the brim of the helmet. As of today, This is all of the progress I’ve made.